My OpenCode Setup: Multi-Agent Coding with Local Models and Gitea
I replaced my AI coding workflow with OpenCode running a 10-agent orchestration system, backed by a mix of free-tier models and a local 27B model on my homelab workstation. Total monthly cost: cheap.
Why OpenCode?
I have been thinking about local AI coding agents for a while. The constraints were clear: no Anthropic, no OpenAI, and definitely no Chinese providers for personal work. I want full control, reasonable cost, and the ability to iterate without hitting API rate limits or watching token bills spiral.
OpenCode is a provider-agnostic, open-source coding agent that runs entirely in the terminal. It has a TUI for interactive sessions and a CLI for one-shot tasks. Critically, it supports arbitrary model providers through its plugin system, which means I can route different tasks to different models — free tier for quick queries, a local 27B model for medium work, and reserve paid models only where they earn it.
Installing OpenCode
OpenCode has three installation methods. The install script is the simplest:
curl -fsSL https://opencode.ai/install | bash
After installation, authenticate your model providers. OpenCode has a free tier called OpenCode Zen that gives you access to several models at no cost:
opencode auth login
Check your configured providers with:
opencode auth list
I use both OpenCode Zen (free tier) and a local vLLM provider running on my homelab.
Updating OpenCode
To update it, just execute command upgrade:
opencode upgrade
Oh-My-OpenAgent: The Multi-Agent Harness
This is where OpenCode gets interesting. Oh-My-OpenAgent is a plugin that transforms OpenCode from a single-model agent into a multi-agent orchestration system. It defines 10 specialized agents, each responsible for a different role in the coding workflow:
| Agent | Role |
|---|---|
| Sisyphus | Primary orchestrator — coordinates complex tasks |
| Hephaestus | Deep autonomous worker for heavy coding |
| Oracle | Architecture consultant |
| Prometheus | Strategic planner |
| Metis | Gap analyzer |
| Momus | Code reviewer |
| Atlas | General support |
| Explore | Fast codebase grep and search |
| Multimodal Looker | Screenshots and vision |
| Sisyphus Junior | Category executor |
Installing Oh-My-OpenAgent
The plugin installs through npm or bun. But don’t do that: just follow the instructions in their Github
Paste this prompt into Claude Code, AmpCode, Cursor, or any agent:
Install and configure oh-my-openagent by following the instructions here:
https://raw.githubusercontent.com/code-yeongyu/oh-my-openagent/refs/heads/dev/docs/guide/installation.md
Epic!
The plugin generates a configuration file at ~/.config/opencode/oh-my-openagent.json. This is where the magic happens — you assign models to agents and categories.
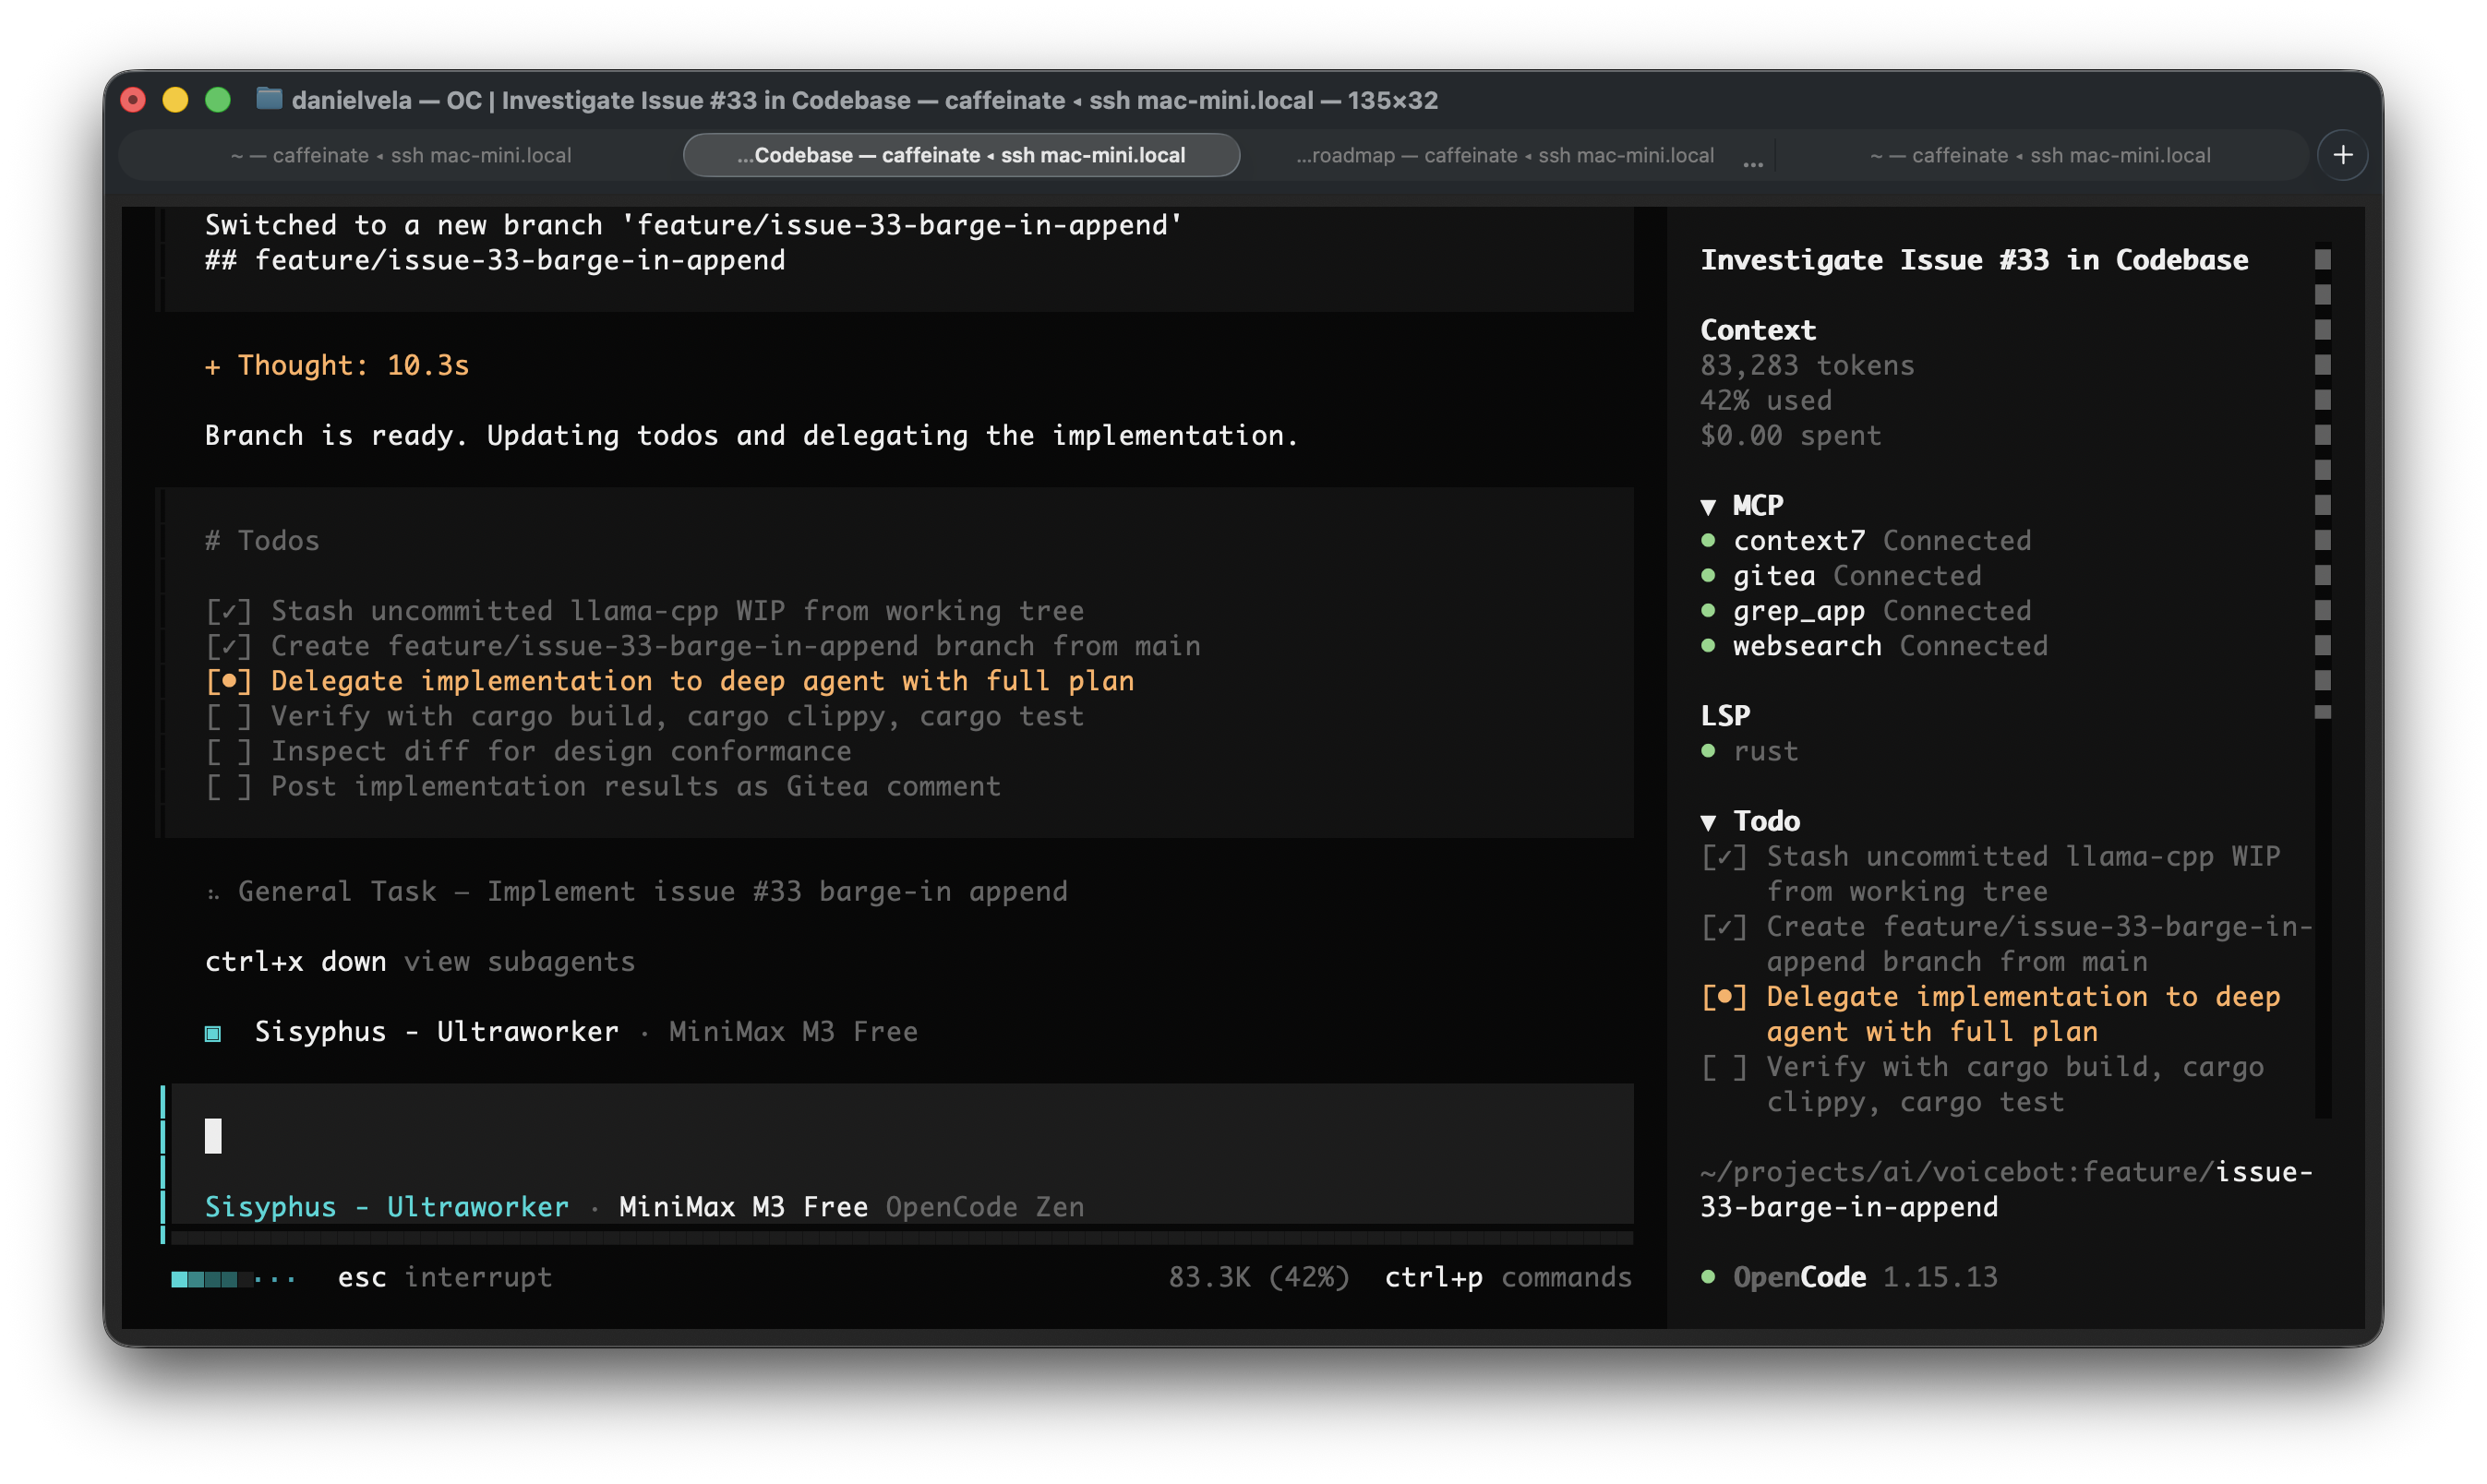
Running Oh-My-OpenAgent
Once installed and configured, Oh-My-OpenAgent activates automatically when you run OpenCode. The plugin intercepts tasks and routes them to the appropriate agent based on the task category.
You can validate the installation with:
npx oh-my-openagent doctor
# or
bunx oh-my-openagent doctor
Model Selection Strategy
This is the most important configuration decision. Oh-My-OpenAgent lets you assign different models to different agents and task categories. My strategy is 100% free and local — no paid API calls.
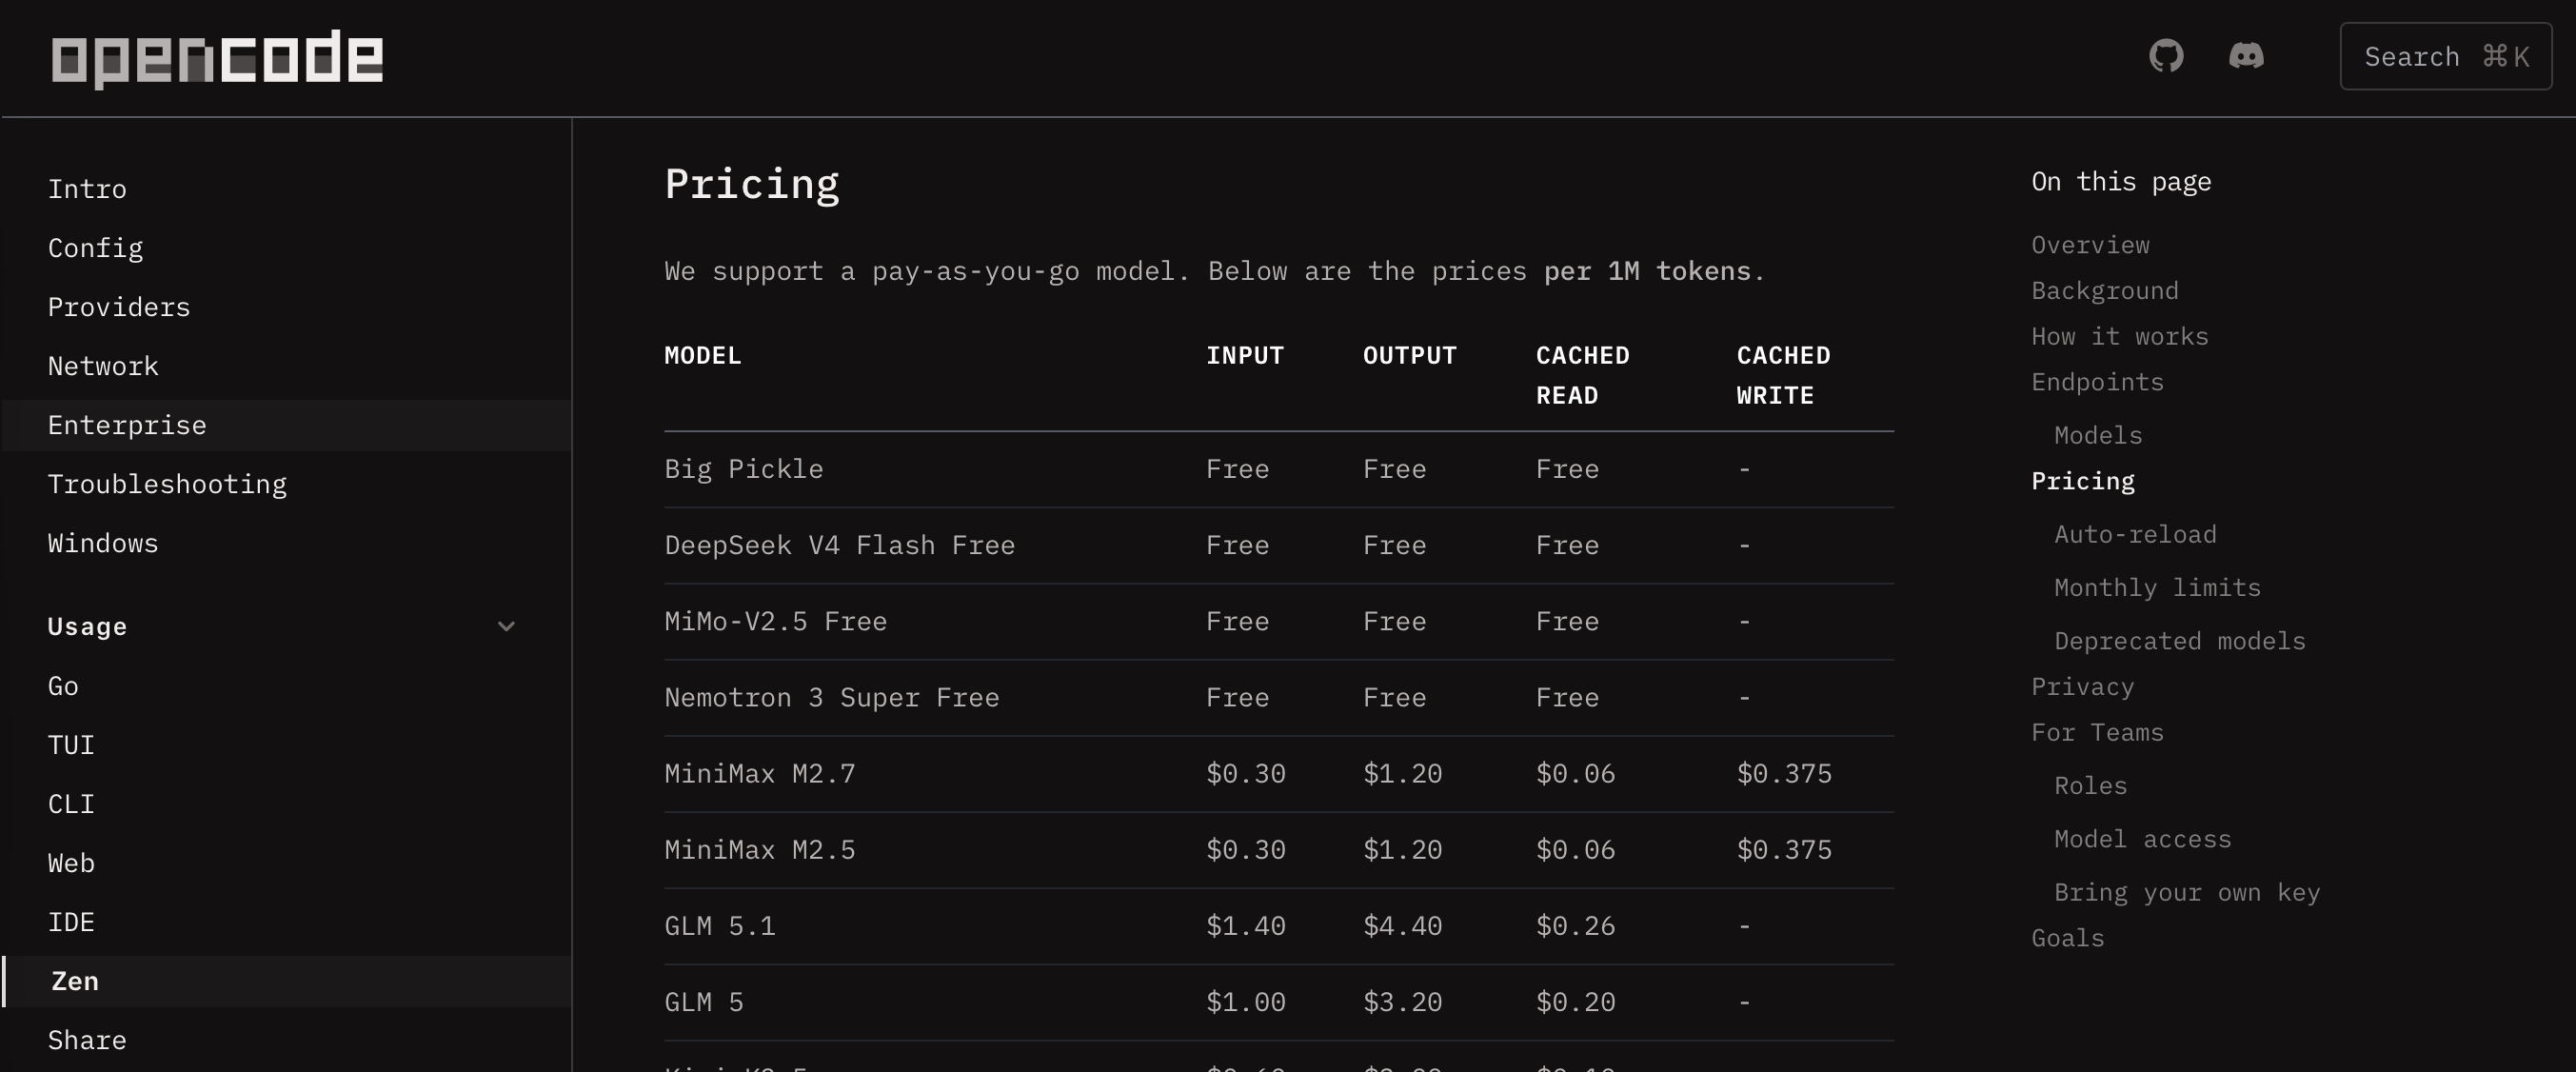
Free Models from OpenCode Zen
OpenCode Zen offers several models free of charge. The current lineup (as first of June 2026) includes:
| Model ID | Family | Use Case |
|---|---|---|
opencode/minimax-m3-free |
Frontier (multimodal, 1M context) | Primary model for complex tasks |
opencode/big-pickle |
Claude-like (GLM 4.6) | Strong reasoning, reliable fallback |
opencode/qwen3.6-plus-free |
Claude-like | General purpose |
opencode/deepseek-v4-flash-free |
GPT-like | Deep thinking, autonomous coding |
opencode/nemotron-3-super-free |
Gemini-like | Reasoning, vision |
opencode/mimo-v2.5-free |
Utility | Fast fallback for simple tasks |
Check the current list at any time with:
curl -s https://opencode.ai/zen/v1/models | python3 -m json.tool
Models with -free in their ID are the free tier offerings. This list changes frequently, so always verify.
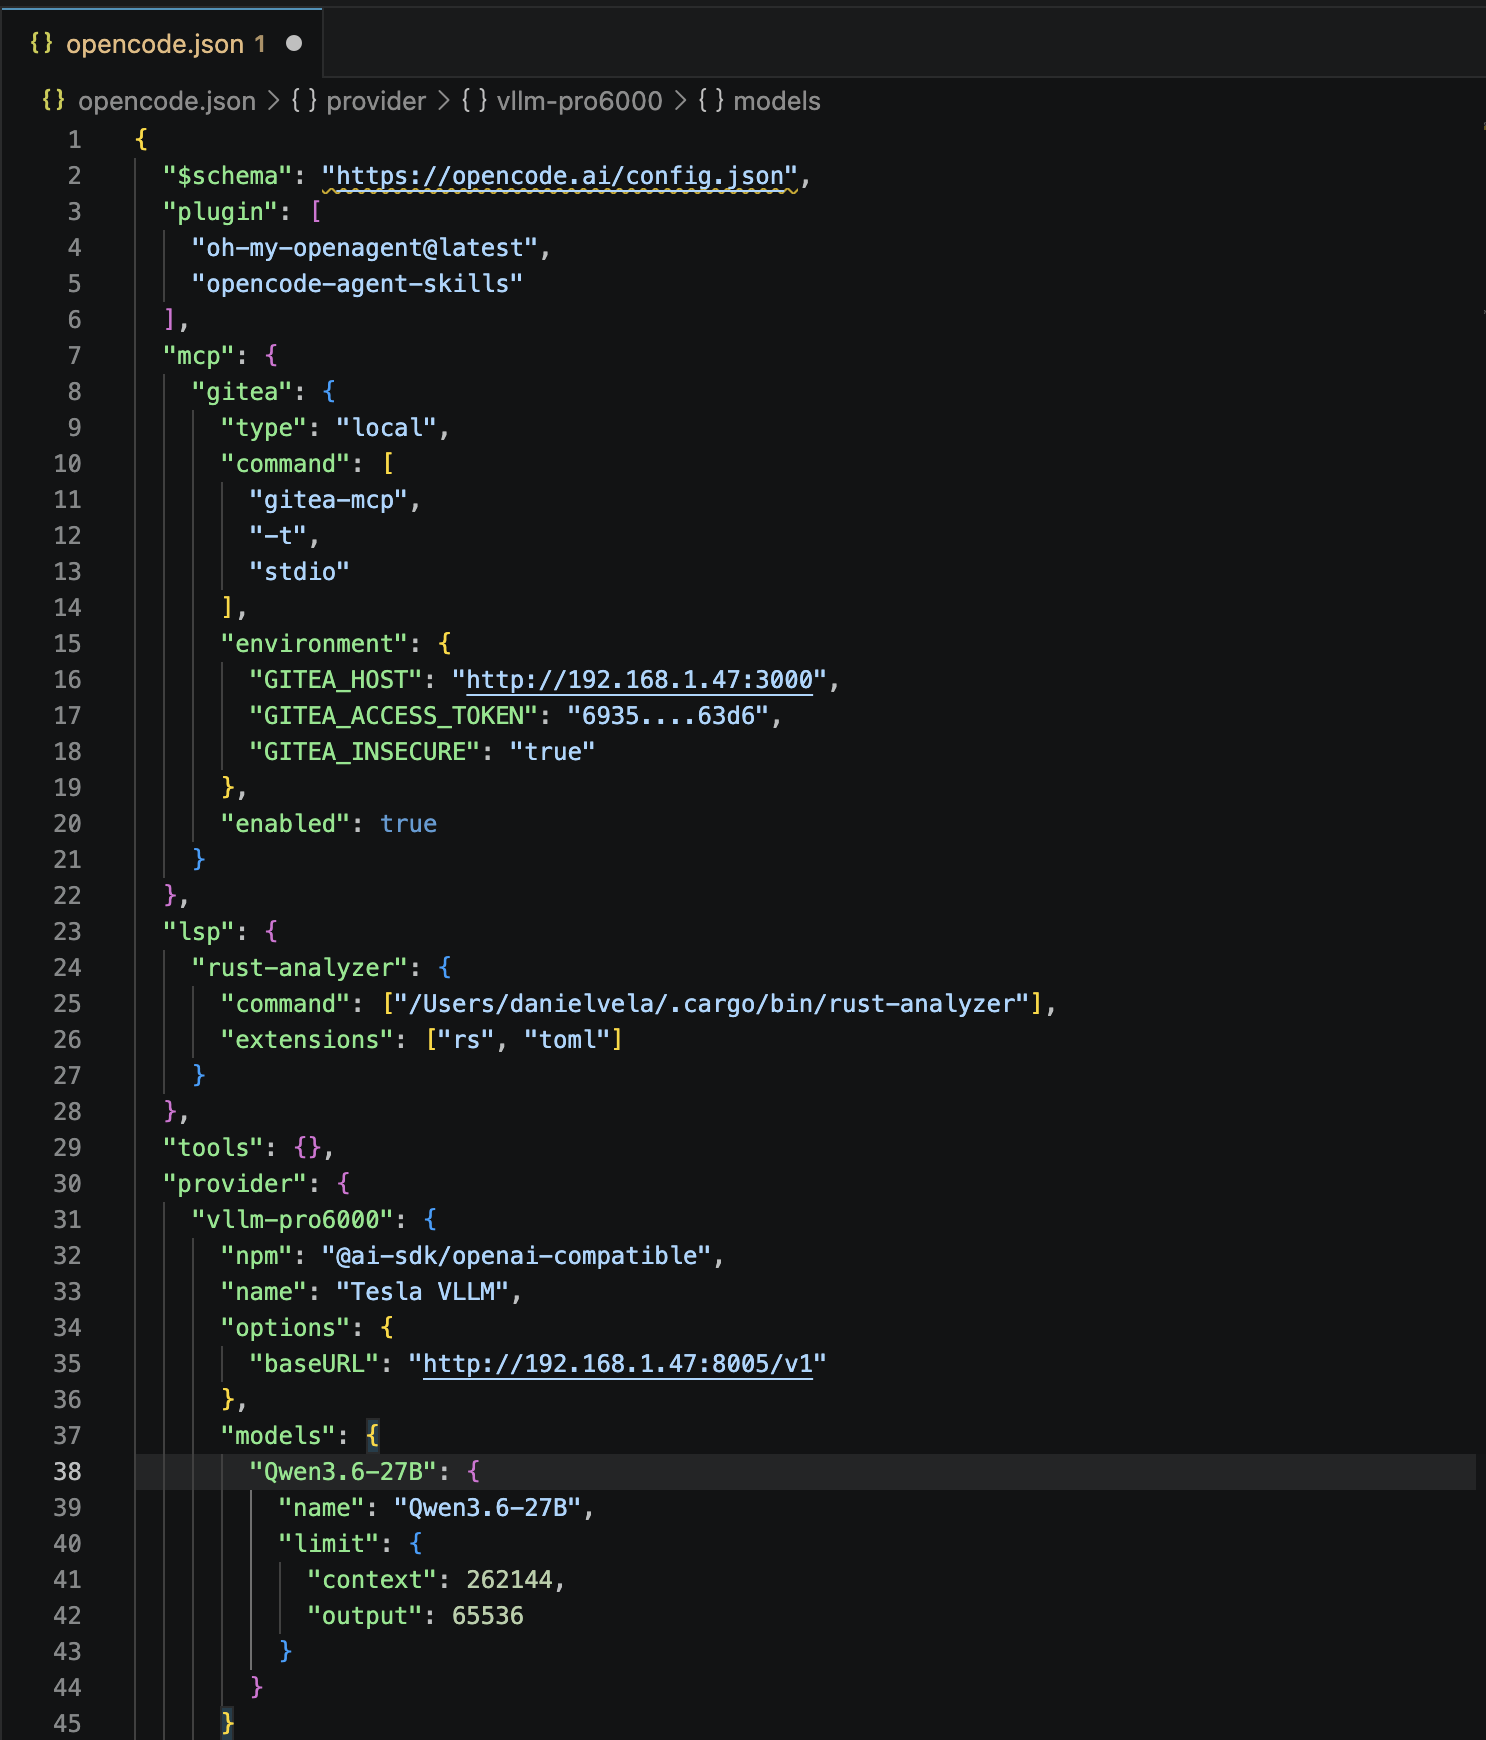
Local Model
My homelab workstation (which I call Tesla) runs a local model via vLLM. This is my anchor for tasks that need to be fast and private:
{
  "provider": {
    "vllm-pro6000": {
      "npm": "@ai-sdk/openai-compatible",
      "name": "Tesla VLLM",
      "options": {
        "baseURL": "http://192.168.1.47:8005/v1"
      },
      "models": {
        "Qwen3.6-27B": {
          "name": "Qwen3.6-27B",
          "limit": {
            "context": 262144,
            "output": 65536
          }
        }
      }
    }
  }
}
This gives me a Qwen3.6-27B model running on an RTX PRO 6000 (96 GB VRAM). It is my fallback for every agent — fast, private, and free.
Agent Model Assignments
Here is my free-tier strategy, mapping models to agents:
| Agent | Primary | Fallback Chain |
|---|---|---|
| Sisyphus | opencode/minimax-m3-free |
big-pickle, qwen3.6-plus-free, deepseek-v4-flash-free, local |
| Hephaestus | opencode/minimax-m3-free |
deepseek-v4-flash-free, nemotron-3-super-free, big-pickle, local |
| Oracle | opencode/nemotron-3-super-free |
minimax-m3-free, deepseek-v4-flash-free, big-pickle, local |
| Prometheus | opencode/minimax-m3-free |
qwen3.6-plus-free, big-pickle, deepseek-v4-flash-free, local |
| Metis | opencode/minimax-m3-free |
big-pickle, deepseek-v4-flash-free, local |
| Momus | opencode/deepseek-v4-flash-free |
minimax-m3-free, nemotron-3-super-free, big-pickle, local |
| Atlas | local | minimax-m3-free, mimo-v2.5-free |
| Explore | local | minimax-m3-free, mimo-v2.5-free |
| Multimodal Looker | local | nemotron-3-super-free |
| Sisyphus Junior | local | minimax-m3-free, deepseek-v4-flash-free |
The key insight: heavy agents get free frontier models, lightweight agents use the local model. MiniMax M3 is the workhorse — it is a genuine frontier model with 1M context window, multimodal support, and sparse attention that competes with paid options on coding benchmarks.
The local model anchors Explore and Atlas because those are fast, low-complexity tasks. Sending a grep query to a remote API wastes time and tokens. A 27B local model handles search and general support in milliseconds.
Category Model Assignments
Oh-My-OpenAgent also supports task categories — different model assignments based on what type of work is being done:
| Category | Primary | Fallback Chain |
|---|---|---|
| ultrabrain | opencode/nemotron-3-super-free |
minimax-m3-free, deepseek-v4-flash-free, big-pickle, local |
| deep | opencode/deepseek-v4-flash-free |
minimax-m3-free, nemotron-3-super-free, big-pickle, local |
| unspecified-high | opencode/minimax-m3-free |
big-pickle, qwen3.6-plus-free, deepseek-v4-flash-free, local |
| visual-engineering | local | minimax-m3-free, nemotron-3-super-free, deepseek-v4-flash-free |
| writing | opencode/big-pickle |
minimax-m3-free, qwen3.6-plus-free, local |
| quick | local | mimo-v2.5-free |
| artistry | local | nemotron-3-super-free, deepseek-v4-flash-free |
| unspecified-low | local | deepseek-v4-flash-free, big-pickle |
The golden rule: always include the local model as either primary or final fallback. This ensures the system never dead-ends.
Picking the Right Models
When selecting models for Oh-My-OpenAgent, I follow these principles:
-
Check OpenCode Zen first — the free model lineup changes. Always verify with the API before committing to a configuration.
- Classify by behavior, not just benchmarks:
- Claude-like models follow instructions well and handle complex prompts (big-pickle, qwen3.6-plus-free).
- GPT-like models are principle-driven and autonomous (deepseek-v4-flash-free).
- Gemini-like models have different reasoning patterns, good for vision (nemotron-3-super-free).
- Utility models are fast and cheap for simple tasks (mimo-v2.5-free).
-
Hephaestus needs deep reasoning — this agent does autonomous, multi-step coding. It cannot run on lightweight models. MiniMax M3 or DeepSeek V4 Flash are the minimum viable free options.
-
Cross-reference benchmarks — I check ArtificialAnalysis.ai for coding leaderboard rankings and cost-efficiency scores. The free tier lineup shifts, but the relative ordering between free models tends to be stable.
- Local model as anchor — it is always present. Fast, private, zero-cost. Use it for Explore, Atlas, and any category where latency matters more than capability.
Gitea Integration via MCP
One of the most powerful parts of my setup is connecting OpenCode to my self-hosted Gitea instance. This lets me say things like “resolve issue #34” and have OpenCode actually look up the issue on Gitea, read its description, implement the fix, and commit it.
Installing the Gitea MCP Server
Gitea provides an official MCP (Model Context Protocol) server:
go install gitea.com/gitea/gitea-mcp@latest
This gives you a gitea-mcp binary that speaks the MCP protocol over stdio.
Configuring Gitea MCP in OpenCode
Add the Gitea MCP server to your opencode.json:
{
  "mcp": {
    "gitea": {
      "type": "local",
      "command": ["gitea-mcp", "-t", "stdio"],
      "environment": {
        "GITEA_HOST": "http://192.168.1.47:3000",
        "GITEA_ACCESS_TOKEN": "your-access-token-here",
        "GITEA_INSECURE": "true"
      },
      "enabled": true
    }
  }
}
Replace GITEA_HOST with your Gitea instance URL and GITEA_ACCESS_TOKEN with a personal access token that has repository read/write permissions. The GITEA_INSECURE flag is only needed if your Gitea uses self-signed HTTPS or HTTP.
The Gitea MCP server exposes tools for issue management, repository browsing, pull requests, and more. Once connected, OpenCode agents can call these tools directly.

Using Issue References
With Gitea MCP configured, you can reference issues naturally:
opencode run "Research issue #34 — explain what it's about and what needs to be done"
Or for full resolution:
opencode run "Resolve issue #5 — fix the bug described in the issue and commit the changes"
OpenCode will:
- Call the Gitea MCP
issue_gettool to fetch the issue details - Read the description, comments, and labels
- Understand what needs to be done
- Make the code changes
- Commit and (optionally) submit a pull request
You can also ask OpenCode to list open issues, triage them, or summarize the state of a repository. The Gitea MCP server supports issue listing, commenting, label management, and more.
Configuring Your Working Directory
For OpenCode to resolve #issue references correctly, make sure you run it inside the cloned repository that matches your Gitea instance:
cd ~/projects/my-repo
opencode run "Fix issue #42"
OpenCode will match the local .git remote to your Gitea MCP configuration. If the remote is on your self-hosted Gitea, the agent will use the MCP tools. If it is on GitHub, it will use the GitHub integration instead.
Configuring Language Server Protocols (LSP)
OpenCode supports LSP servers for language-specific intelligence. This is essential for getting accurate code suggestions, type checking, and refactoring support.
Here is my LSP configuration for Rust:
{
  "lsp": {
    "rust-analyzer": {
      "command": ["/Users/danielvela/.cargo/bin/rust-analyzer"],
      "extensions": [".rs", ".toml"]
    }
  }
}
For other languages, the pattern is the same — specify the command path and the file extensions the server should handle. Common LSP servers include:
| Language | LSP Server | Install |
|---|---|---|
| Rust | rust-analyzer |
cargo install rust-analyzer |
| Python | pyright |
npm i -g pyright |
| TypeScript | typescript-language-server |
npm i -g typescript-language-server |
| Go | gopls |
go install golang.org/x/tools/gopls@latest |
| Java | eclipse.jdt.ls |
Download from Eclipse |
LSP integration gives OpenCode type awareness, import resolution, and accurate code completion. Without it, the agent is working blind on language-specific details.
Using OpenCode: Daily Workflow
One-Shot Tasks
For bounded tasks that do not need iteration, use opencode run:
opencode run "Add retry logic to the API client and update the tests"
You can attach files for context:
opencode run "Review this config for security issues" -f config.yaml -f .env.example
Force a specific model:
opencode run "Debug why the tests fail in CI" --model opencode/minimax-m3-free --thinking
Interactive Sessions
For iterative work, launch the TUI:
opencode
This opens the terminal interface. Use Ctrl+X M to switch models, Ctrl+X N for a new session, Ctrl+X L to switch sessions, and Ctrl+C to exit.
Monitoring Progress
One important thing: the TUI is not easily monitorable from outside. If you need to automate or supervise sessions, prefer opencode run over the interactive TUI. The one-shot mode gives you complete output when finished, while the TUI redraws with ANSI escape codes that make external monitoring unreliable.
For long-running tasks, use the --model flag explicitly. Without it, OpenCode may try to resolve the default model from opencode.json, which can cause ProviderModelNotFoundError if the provider prefix is missing:
# Correct — includes provider prefix
opencode run "Refactor auth module" --model vllm-pro6000/Qwen3.6-27B

# Wrong — will fail with ProviderModelNotFoundError
opencode run "Refactor auth module" --model Qwen3.6-27B
Session Management
Check your token usage:
opencode stats
List past sessions:
opencode session list
Resume your last session:
opencode -c
Lessons Learned
The local model is more valuable than I expected. A 27B model on a dedicated GPU handles code exploration, quick fixes, and simple tasks faster than any remote API. The latency advantage is enormous — sub-second responses versus the 10-30 second round-trip to a cloud provider. Reserve free tier and paid models for tasks that genuinely need more capability.
MiniMax M3 is the free-tier workhorse. At SWE-Bench Pro scores around 59%, it competes with models that cost real money. The 1M context window means you can feed it entire codebases, and it actually uses that context effectively. The sparse attention mechanism gives it 15.6x speed advantage on long contexts compared to dense attention.
Oh-My-OpenAgent changes the workflow. Instead of manually picking which model to use for each task, you delegate to the orchestrator. Sisyphus figures out whether a task needs deep reasoning, quick search, or creative exploration, and routes it accordingly. The agent model assignments are the configuration surface — once set up well, the system runs itself.
Gitea MCP is the missing piece. Issue-driven development — “fix issue #34” — is how I actually work. Connecting OpenCode to my self-hosted Gitea via MCP makes this seamless. The agent reads the issue, understands the scope, implements the fix, and commits it. The tea CLI and gitea-mcp together form a complete local development loop.
Putting It All Together
My complete opencode.json looks like this:
{
  "$schema": "https://opencode.ai/config.json",
  "plugin": ["oh-my-openagent@latest", "opencode-agent-skills"],
  "mcp": {
    "gitea": {
      "type": "local",
      "command": ["gitea-mcp", "-t", "stdio"],
      "environment": {
        "GITEA_HOST": "http://192.168.1.47:3000",
        "GITEA_ACCESS_TOKEN": "your-token-here",
        "GITEA_INSECURE": "true"
      },
      "enabled": true
    }
  },
  "lsp": {
    "rust-analyzer": {
      "command": ["/Users/danielvela/.cargo/bin/rust-analyzer"],
      "extensions": [".rs", ".toml"]
    }
  },
  "provider": {
    "vllm-pro6000": {
      "npm": "@ai-sdk/openai-compatible",
      "name": "Tesla VLLM",
      "options": {
        "baseURL": "http://192.168.1.47:8005/v1"
      },
      "models": {
        "Qwen3.6-27B": {
          "name": "Qwen3.6-27B",
          "limit": {
            "context": 262144,
            "output": 65536
          }
        }
      }
    }
  }
}
And oh-my-openagent.json defines the agent and category model assignments shown above.
Next Steps
The obvious upgrade path is a second GPU. I am considering an additional RTX PRO 6000 to serve larger models — 70B and beyond — that do not fit in 96 GB of VRAM. Two GPUs would let me run separate vLLM instances for different model sizes, routing them through the same provider configuration.
Beyond hardware, the next iteration is better issue automation. I want OpenCode to not just resolve individual issues but to triage entire repositories — scan open issues, prioritize by impact, and batch-fix related bugs in a single session. Oh-My-OpenAgent is already set up for this; it just needs the right prompt.